Snapping & Alignment
Everything you drag on the timeline lands somewhere sensible, because of snapping. This page covers the snap grid, the difference between hard and soft snap, the keys that change snapping mid-drag, and the ways to line things up with each other, both in time and in value.

The snap grid
The magnet button in the transport's top row (between Zoom and Loop) opens the snap menu. The short label beside it shows the current grid.
| Grid | Label | What it means |
|---|---|---|
| 1 Second | 1s | Whole seconds. |
| ½ Second | ½s | Half seconds. The default. |
| ¼ Second | ¼s | Quarter seconds. At 30 frames per second a quarter second is seven and a half frames, so marks land on the nearest frame (0, 8, 15, 23, 30, and so on). |
| Single Frame | 1f | One frame, a thirtieth of a second. |
| Audio Transients | AU | Sharp jumps in loudness detected from the audio clips' waveforms. A small AU sensitivity slider appears; drag it right for more snap lines. |
There is no "off." If you want to drop something between grid lines, use soft snap or hold Shift while dragging (both below).
Press G to cycle through 1 second, ½ second, ¼ second, and single frame. Audio Transients is only in the menu. Your snap settings are remembered per show on that computer.
Audio Transients snaps to the waveform, not the transcript. Transcript words and events aren't snap targets; they're for CarlBot and talking props (see Tips and Tricks).
Hard snap and soft snap
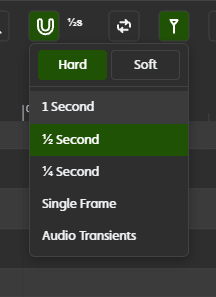
The same menu has a snap strength setting, and Shift+G toggles it:
- Hard (the default): whatever you drag always lands on the grid.
- Soft: whatever you drag lands on any frame, but gets pulled onto the nearest of these when it comes within about eight screen pixels:
- a grid line
- the start or end of any clip
- any control point, pan/tilt point, or color stop anywhere in the show
- the playhead
Soft snap is the one to use when you're lining things up with each other rather than with the clock. Zooming in makes the magnet more precise, because the eight pixels cover less time.
While you drag, a dashed vertical guide line shows what caught you: one color for a grid line, the selection color for another clip or point, and the playhead color for the playhead.
Keys that change snapping mid-drag
Both work in Hard and Soft mode, and only for the drag you're in the middle of:
- Hold
Fto snap to single frames. - Hold
Shiftto drag free. The item lands on a frame and nothing pulls on it.
The magnet's own tooltip sums it up: "G cycles grids, Shift+G toggles hard/soft, hold F for frames, Shift to drag free."
What snaps
Snapping applies to moving, resizing, and drawing clips (trigger, audio, and state clips), the Split tool's cut line, placing and dragging control points, pan/tilt points, and color stops, Range tool selections (so generator ranges too), and where a paste or template lands.
A few things deliberately don't snap:
- Clicking the ruler or seeking. The playhead lands on the nearest frame.
- The loop region handles (frames).
- Split at Playhead (
Ctrl+K), which cuts exactly at the playhead. - Slipping audio inside a clip (
Alt+drag).
Lining up values
On dimmer tracks, snapping works up and down as well as left and right. Drag a control point and it's pulled to the value of the point before or after it when within two percent, with a dashed horizontal guide at that value. That's how you get a flat hold or a matched peak without typing numbers.
In Draw mode, clicking within a few pixels of the envelope line places the new point exactly on the line, so you can add a point mid-ramp without kinking it.
Values are whole percents from 0 to 100. Hold Shift to turn the value magnet off for a drag. It doesn't apply when dragging several points at once, or to pan/tilt points and color stops.
The start and end points of a track are linked: drag one and the other follows, which keeps loops seamless. Hold Ctrl to move just one, or double-click a point and use the Sync paired endpoint switch. See Endpoints.
Lining things up in time
There are no align or distribute commands. In practice you don't miss them, because three things do the job:
- Soft snap. Drag a clip toward another clip's edge, a control point, or a color stop on any track and it clicks into place, with the guide line to confirm.
- The playhead. Put the playhead where you want things to land, then drag to it in soft snap. Press
,and.to step the playhead backwards and forwards through every clip edge, point, and color stop in the show, so it's easy to park it exactly on something. - Duplicate.
Ctrl+Dplaces a copy of the selection starting right where the selection ends, which is the fastest way to build a repeating pattern that stays on the grid.
Pasting works the same way: Ctrl+V shows a ghost box you place with the mouse, green where it fits and red where it doesn't, snapped like any drag. Esc cancels. The clipboard lives inside the editor for the show you have open.
Selecting and moving several things
Ctrl,Cmd, orShift+ click adds an item to the selection or removes it (color stops:CtrlorCmdonly).- With the Select tool, drag a box in empty space to select clips, points, color stops, and pan/tilt points across tracks. Hold
Ctrl,Cmd, orShiftto add to what you have. This is mouse only. - Click a track header to select everything on that track; click again to deselect.
Ctrl+Aselects every clip in the show (every point, if the show has no clips).Escclears the selection.
Drag any selected item and the whole selection moves together in time, each item staying on its own track. Each item snaps separately, and clips won't overlap each other. A mixed selection of clips and points moves together too, and the points also move up or down by the same amount. Items never change tracks.
The arrow keys move the playhead one frame at a time; they don't nudge the selection. The full list is on Keyboard Shortcuts.